How to make a garden pond
A garden pond can transform the atmosphere of a garden, adding colour, light and movement. If you include a pond pump [link] then you can enjoy the soothing sound of moving water too. In a small garden an area of open water can actually increase the sense of space. In my Hampshire garden I have three ponds – one large and two small – and each of them has a different character. Birds love them, and their reflective surfaces fill the garden with light on the dullest day.
There are several different styles of garden pond; which you choose and how you stock the pond will depend on the style of your garden and the space you have available. Square, circular and rectangular ponds are ideal for formal gardens, while irregular-shaped ponds, such as the popular kidney-shape, look best in less formal settings. Any pond will attract visiting wildlife, but if you design and construct it with their needs in mind you can create a perfect home for frogs, insects, birds and many other wild creatures.
Siting a pond
It is essential that a pond is sited correctly from the start; it is very difficult to put things right later on. A poorly sited pond will also require more maintenance to keep it looking good. Choose an open, sunny site that is not exposed to the prevailing wind. Avoid areas that are in deep shade or near overhanging deciduous trees. If you are sinking the pond into the ground, make sure the site you choose is free from underground obstacles, such as drainpipes and cables.
Bear in mind how the pond will integrate into its surroundings. Choose a position where there is space to plant a border along at least one side of the water feature to provide a natural transition into the rest of the garden. Also consider what the reflection in the surface of the water will be like. Try out your ideas before you begin construction, by laying out canes or a piece of hosepipe in the shape of the proposed feature and check the effect from places where you are most likely to view the pond, such as the house and patio. Make any adjustments necessary until you are entirely satisfied.
What size pond?
In general, the larger the pond the easier it will be to look after, provided it has been sited in the right place. If you want a traditional feature, filled with aquatic plants and fish, a pond with a surface area of around 5m² (that's about 7x8ft in old money) will be large enough to be self-sustaining. The deepest area should be about 60cm (2ft), with 15-cm (6-in) deep shelves running along the edges where shallow-water marginal plants can be grown. It is important to have deep-water areas in a pond to prevent rapid fluctuations in water temperature that can put fish under stress.
If you want something smaller, then be prepared to maintain your pond regularly or forget about stocking it with fish. Plant-only pools can look very attractive and still be home to a wealth of wildlife. Indeed, if you want a wildlife pond, it is important not to add fish to the water because they will eat many of the creatures you are trying to encourage.
Calculating the size of liner
If you have decided to use a flexible liner for your pond you will need to work out which size of liner to buy. The easiest way to do this is to use the following formula:
2 x maximum depth of pond + maximum length of pond = length of liner required
2 x maximum depth of pond + maximum width of pond = width of liner required
So, for a pond that is 4x3m with a maximum depth of 50cm you would require a liner that is at least 5m by 4m.
Which liner?
There are basically two types of liner: flexible and rigid. Flexible liners are available in various materials including PVC, butyl rubber, LDPE and polythene; while rigid liners are either fibreglass or rigid plastic.
Flexible liners
Polythene is the cheapest option, but will last just a few years and is easy to puncture. The rest are all stronger and will last three or four times as long. Butyl rubber is the best, lasting up to 20 years, but it is the most expensive.
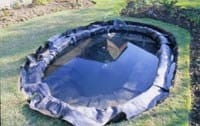
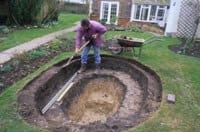
Installing a flexible liner
- Use a hosepipe to mark out the size of the pond on the ground. Dig the whole area down to the depth of 20cm (8in). Make the sides slightly sloping towards the centre of the pond.
- Then mark the deep-water areas and dig out the soil in the middle of the pond to a depth of about 65cm (26in), again making the sides slightly sloping.
- At each stage of excavation, check that the top edge of the pond and marginal shelves are level in both directions using a piece of straight timber and a spirit-level.
- Once excavation is complete, remove any stones protruding into the hole before lining all surfaces with a 5cm (2in) layer of damp sand.
- On a warm day lay the pond liner out over the prepared hole and weigh down the edges with stones. Slowly fill the pond with water from a hosepipe, while circling the liner and gently tugging at the edge to remove any creases. When the water is within 5cm (2in) of the rim of the pond, turn off the tap and leave the pond to settle for 24 hours.
- Trim the liner to leave about 15cm (6in) of overlap around the pond, then add the edging.
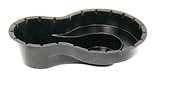
Rigid liners
There is not much to choose between the plastic and fibreglass rigid liners, both of which are very strong and will last about 15 years. So base your choice on the overall shape and dimensions you want.
Installing a rigid liner
- Stand the liner in the correct position and then mark the position of the edge of the liner on the ground with sand or spray paint.
- Make a second mark about 30cm (12in) further out to indicate the area to be excavated.
- Dig the whole area down to the depth of the marginal shelf plus 5cm (2in). Make the sides slightly sloping towards the center of the pond.
- Then mark the deep water areas and dig out the soil in the middle of the pond to the maximum depth of the liner plus 5cm (2in), again making the sides slightly sloping. At each stage of excavation, check that the top edge of the pond and marginal shelves are level in both directions using a spirit-level.
- Once excavation is complete, remove any stones protruding into the hole before lining the bottom of the deep-water area with a 5cm thick layer of damp sand.
- Stand the rigid liner on the sand and check the levels of the liner. When it is in the right position, wedge pieces of wood around the sides to hold it steady. Then carefully fill in around the sides of the pond, while slowly adding water to the liner from a hosepipe.
- Ram the infill down with a piece of wood to make sure there are no air-pockets, paying particular attention to the areas under the marginal shelves. Check the liner is still level from time to time and make any minor adjustments necessary. Once all the gaps around the liner are filled and the pond is full of water, leave it for 24 hours before adding the edging.
Edging your pond
A pond needs a neat and practical edging to make it an attractive feature. You can edge a pond in a range of different materials; which one you choose will depend on the style of pond you are trying to create.
Formal ponds These require a formal edging. This is easiest to achieve using paving slabs bedded on mortar, trapping the edge of the liner underneath. For best effect, make sure the paving overhangs the edge of the pond by about 5cm (2in) to help hide the liner from view.
Informal ponds Irregularly shaped pools look best using paving of different sizes or bricks that can be laid on edge to follow the sweep of the curve. In my garden I have used pebbles and cobbles which run down into the water and can be left loose. If you use paving slabs or bricks you will have to bed the edging material on mortar, trapping the edge of the liner underneath. If you want a more natural look, at least part of the pond can be edged as described for wildlife ponds, below.
Wildlife ponds A wildlife pond needs a natural-looking edge that allows easy access for the resident and visiting wild creatures. I created this effect in my garden with the pebbles to make a beach effect, but you can also lay turf right into the water or rely on the cascading foliage of adjacent plants. Bear in mind that turf laid up to the edge of the pond cannot be treated with chemicals and soil and grass clippings are more likely to fall into the pond, fouling the water. It is worth including a safe place along one edge to view the wildlife – timber decking is a good choice because it blends in well, but assorted paving or bricks can also look effective.
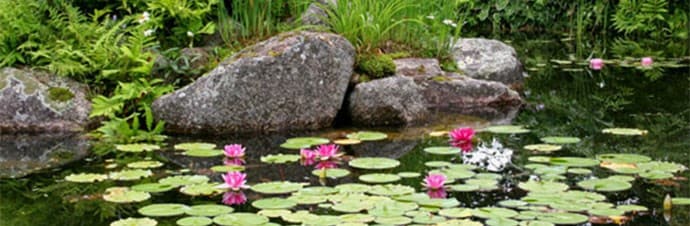
Adding life to your pond
Most pond plants are easy to grow and require little maintenance other than the occasional tidy up to remove tired-looking foliage or fading flowerheads. However, for a pond to be relatively easy to look after you have to choose varieties that suit the size of the pond and the depth of the water. You also need to bear in mind how the plants will combine together if you want to achieve an attractive looking water feature for most of the year.
Easy-care ponds
If you have a pond with a surface area of around 5m² and you choose the right combination of plants, the pond can be virtually self-sustaining. Aim to cover at least one-third of the surface area with floating plants to cut down the amount of sunlight penetrating the water.
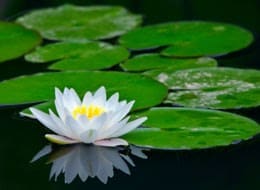
Floating leaves, such as waterlily pads, not only provide shade and hiding places for young fish, but also prevent the growth of algae that can turn the water a murky shade of green.
Submerged plants are also an essential ingredient of an easy-care pond. They help oxygenate the water and absorb any excess of nutrients on which green algae would otherwise feed. Aim to add about 10 submerged plants per square metre of surface area.
Plants which grow in the shallow water at the edge of a pond are known as marginal plants. Most will spread out to cover an area of 30-50cm (12-20in), so they eventually need to be spaced at this distance along the shelf. However, to create instantly attractive planting, group plants closer together and use containers filled with flowers and foliage around the pond to help soften the edges.
Provided you grow your aquatic plants in suitable containers and are prepared to lift them out and divide them when they get overcrowded, most plants will not get out of control. However, if you allow the plants to root in the sediment so that they can spread at will, then small and medium-sized ponds can soon become choked with the more vigorous kinds. For this reason, vigorous plants, such as the waterlily Nymphaea alba [link], deep water plant Nuphar lutea [link]and marginals such as cyprus hedge (Carex pseudocyperus), soft rush (Juncus effusus) and water mint (Mentha aquatica) are a really only suitable for a large pond.
Planting Pond plants are best planted in spring, so they have plenty of time to get established, but they can be successfully introduced at any time during the growing season. Choose a sunny warm day to make the job more pleasant. Use a special aquatic basket with lattice-work sides to plant both marginals for the shallows around the edge of the pond and for deep-water plants such as waterlilies.
It is also important to use special aquatic compost which releases nutrients slowly otherwise the pond water will turn green with algae. After planting, cover the surface of the compost with a 2cm (1in) layer of washed gravel which will prevent fish from stirring up the compost. Plunge each basket into a bucket of pond water until the air bubbles stop coming out of the compost. Then place the plant in the pond.
Positioning waterlilies Stand waterlilies on bricks so that their leaves are just below the surface. As the leaves grow, lower the basket in stages until it is sitting on the floor of the pond. You’ll be surprised how quickly this happens – often in a matter of days. Alternatively, trim off all the mature leaves and position the plant directly at the correct depth. All new leaves will naturally extend until they reach the surface. You can avoid getting wet when positioning deep-water plants by threading two pieces of string through either side of the basket. Then, with someone holding the other ends of each string, carefully lift the plant over the pond and lower it to the bottom. When in position, let one end of the strings go and pull them back through the basket, without moving it.
Stocking with fish
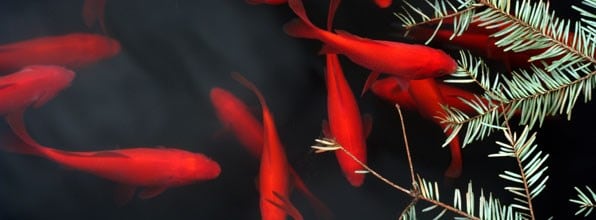
Once the pond is planted, wait for about a month for the plants to settle in before adding fish. Pond fish are normally supplied in polythene bags in which you transport the fish from the aquatic centre or pet shop to your pond. It is important to do this carefully and quickly to minimise the shock to the fish.
Once home, keep the fish in a cool place, such as a garage, until early evening. Then carefully float the bag containing the fish on the surface of the water for about an hour. This will allow the temperature of the water in the bag to slowly cool to that of the pond. If the pond is still in direct sun, cover the bag with a piece of newspaper to shade the fish. After an hour or so, open the bag up and allow in a little pond water and leave for another ten minutes before releasing the fish out of the bag.
Wildlife ponds If you are creating a wildlife pond and want to stock your pond with other creatures, the easiest way to do this is to ask a friend with an established pond if they could scoop out a bucketful of sediment from their pond, then pour this into yours. In the spring you can also introduce frogspawn often made available by wildlife centers and other conservation organisations. Do not collect any creatures from the wild. I started my own wildlife pond by simply letting nature take its course. Within a day pond skaters had arrived, and now – three years on – I have dragonflies and damsel flies, newts frogs and toads, water boatmen and heaven knows what else. Once your pond is up and running, the creatures that need it have their own way of finding it!
How many fish?
When stocking a new pond, allow up to 25cm (10in) of fish for each square metre of surface area. Therefore, for a pond with a surface area of 5m² you should not add any more than ten 12cm long fish. This will give the fish plenty of room to grow.